Stock & Noble

Horserail Installation – How to plan for the materials and install the fence.
- BY Tripti Kakkar
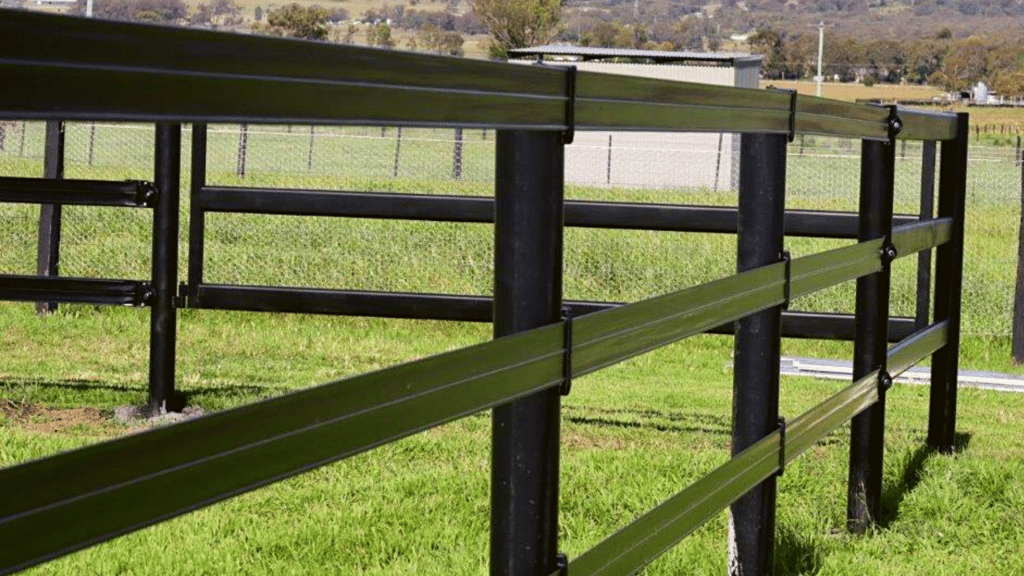
Horserail® is a flexible plastic rail that is designed to be used for round yards, paddocks, pastures, tracks, and gallops. It comes with a patented spooler and buckle system and is typically considered easy to install. Some owners install it themselves, while others prefer to hire a professional. It is most commonly used as a permanent horse fence but can also be used as a moveable option.
Today the term “Horserail” has become generic to the whole category of flexible plastic rails. At Stock & Noble, we provide the original Horserail® to our customers across Australia and New Zealand. We often get questions about planning for the materials needed for the installation and the process of installing Horserail®, especially when our partners are putting it up themselves.
So, with this article, we hope to answer most of the questions about Horserail installation and help guide the ones who are considering buying Horserail for their properties.
If you too want to know more about the planning and installation process of Horserail® and decide if it’s easy enough to do it yourself or hire a professional, then keep reading.
In this article, we will discuss the detailed steps of
- How to plan for the installation of Horserail fencing on your property.
- How to install Horserail on your horse property in 8 simple steps.
How to plan for the installation of Horserail fencing on your property.
If you’ve chosen Horserail as a preferred fencing option for your property, you need to know the quantity of fencing materials you would require for the installation.
You can achieve this in three steps.
Step 1: Map out the layout of your property
The first step in planning your fence is to map the layout and figure out how many of each element is needed:
- Laneways
- Gateways
- Corner assemblies
- End assemblies
- Fence Posts (commonly known as intermediate or line posts)
Step 2: Determine the rough meterage
Work out a rough meterage of each paddock, so you know how much Horserail you actually need to order. To know an estimated cost of your fencing material, you can use this free interactive tool, “Map my fence.”
Step 3: Determine the quantity of fittings needed
If you know the rough meterage and have a fencing plan in place, figure out the quantity of fittings required for your project. How many of these would you need:
- Insulating line brackets – Take a count based on how many line posts are there.
- Attaching buckles – You need one buckle for every start and stop position. So, count accordingly.
- Tensioning spooler – You need one spooler for every rail you’re going to put up.
- Internal corners – Check how many internal corners are there in the paddock and count them all in.
How to install Horserail?
Now you’ve chosen Horserail, mapped out your fence and ordered the quantity of all the materials needed for a successful project, it’s time to go ahead and start installing the Horserail.
Follow these 8 simple steps to install the Horserail yourself or hire a fencing contractor to do it for you.
Step 1: Mark out your fencing line
The best way to begin installing Horserail® is to know where everything is going to go. If you have a rough idea of the fence lines, then mark them out and mow the grass along the proposed fence lines. The lower the better. This will give you a sense of how the fence will flow and help you follow the natural terrain of the land while installing Horserail®.
Step 2: Mark out assemblies and gateways
The next step is to mark out the location of the gates. When this is completed, it will determine where the end assemblies will be placed. Finally, mark out the corner assemblies.
Step 3: Put the corners and end assemblies
After marking the positions of your gates and assemblies, you can begin installing them. You can do this by ramming the posts and cutting the steel rails to length. Steel rails can be welded together for a stronger and longer-lasting result, or they can be attached using bracket fixing system. First these brackets are screwed to the post. Afterwards, rails are screwed to brackets.
Even though the bracket method is more expensive, it does help the DIYer and can also save time. This is where you might opt for a fencing contractor to complete this task.
The process of installing end or corner assemblies is the same for Timber and Steel Posts.
However, with Timber posts, you bolt or screw the timber together rather than welding, and then put in a wire cross brace to give it the strength for when tensioning the Horserail.
Step 4: Determine the position of the line posts
Measure the distance from one corner assembly to the other and divide it by 3 or 4 metres, depending on what your desired post spacing is. Once you know the position of posts, it’s time to put the choice of your posts in.
Step 5: Install the posts on your fencing line
When it comes to installing posts with Horserail, you have a choice between Plastic, Steel and Timber.
To install Timber or Steel posts, you need to ram the posts into the ground and then attach the rails. This is the time-consuming and laborious part of the project and requires heavy machinery such as a tractor with a ramming mechanism. We advise you to hire a fencing contractor to do this job. You can use their services to ram the posts in and then always attach the rails yourself later. This will definitely help in reducing the overall cost of installation.
In some cases, Plastic posts, cannot be rammed in. A small tip here is to pre-drill the hole slightly undersized and then ram in. The time and cost of this part depend on what kind of obstacles are in the ground – whether it’s rocky, loamy or clay.
Step 6: Put on the fittings
Start with the attaching buckles at your start and finish points which most commonly are on either side of the gate.
Once you’ve fixed your buckles on, put your line post brackets, on the line posts. We suggest just putting the top screw in for now.
Step 7: Put up the rails
We recommend that the posts should be painted before they are attached. So, if you’re planning to paint your Steel or Timber posts, now would be the right time. If you’re using plastic posts, then you’re good to go.
Once your fence posts and fittings have been attached, it’s time to install the rail. You should begin by attaching the rail to one of the attaching buckles, then continue working around the paddock, inserting the rail into the brackets as you go.
When you reach the other end, pull the rail up as tight as you can while leaving enough to feed around the buckle and cut it. If your both ends are fixed, finish by screwing the line post brackets.
Typically, if you are doing a 3 or 4 rail fence, you can run the 3 or 4 rails at one time. This can be done using a special payout box or an oversized spinning jenny.
Step 8: Tension your fence
Now that the rails are up and the brackets are all screwed on, it’s time to tension them.
Add a tensioning spooler and tension rail in the middle of a length until it is tight. It is important that there’s no sagging at any point, as it would take away from the great look of the fence.
Once the tensioning is done your Horserail® is up. It’s ready to protect your horses, making your property look stunning.
Ready to install Horserail on your property?
Once the rails are well tensioned, step back and take a look at your property. We are sure you’ll be proud of your choice of fencing.
In this article, you learnt the three steps to follow and plan the number of fencing materials needed for your project. You also learnt the 8 steps path to install Horserail on your property.
If you’re looking to opt Horserail, it will be worthwhile to learn more about where and how to buy the Original Horserail in Australia.
If you have more questions on the cost, availability, planning, and installation of Horserail speak to our fencing expert. We are there to guide you in every possible way and help you find the finest fencing solution that’s right for you and your property.


